
India’s digital economy has rapidly transitioned toward paperless documentation and instant digital consent. From bank account openings and insurance policies to employment contracts and vendor agreements, millions of documents now require secure digital execution.
This transformation has made Aadhaar eSign one of the most widely used digital signing mechanisms in India.
Aadhaar eSign allows individuals to digitally sign documents using OTP or biometric authentication linked to their Aadhaar identity, eliminating the need for physical paperwork or USB-based digital signature tokens.
For enterprises handling large volumes of documentation, platforms such as Melento integrate Aadhaar authentication with automated document workflows, enabling secure, compliant, and scalable digital signing.
What Is Aadhaar eSign?
Aadhaar eSign is an electronic signature service that allows individuals to digitally sign documents using Aadhaar-based OTP authentication. It is legally valid under the Information Technology Act, 2000, and uses authentication provided by UIDAI.
In simple terms:
- You upload a document.
- Enter your Aadhaar number or Virtual ID (VID).
- Authenticate via OTP.
- A legally valid digital signature is applied.
Aadhaar eSign is widely used in banking, fintech, HR onboarding, contract management, insurance, and government workflows.
What Is Aadhaar-Based eSign?
Aadhaar-based eSign refers to the process of electronically signing a document using Aadhaar authentication (OTP or biometric) without needing a physical digital signature token.
It eliminates:
- Paper signing
- Physical presence
- USB-based DSC tokens
- Manual verification
Instead, it generates a digital signature certificate dynamically for that specific transaction.
How To Aadhaar eSign Using Melento (Step-by-Step Guide)
The process for Aadhaar eSign involves two primary workflows: the Initiator Journey, where the document is prepared and sent, and the Signer Journey, where the recipient authenticates their identity to affix the signature.
Initiator Journey
- Login and Dashboard: The initiator logs into the SignDesk portal and navigates to the Workflow Dashboard.
- Document Creation: Click New Document and select either individual or multiple workflows. You can then upload a document or select a predefined template.
- Details and Stamping: Optionally add a document title, description, and key terms. If required, enable Digital Stamping to include stamp duty payment in the workflow.
- Add Stakeholders:
- Select Digital Signature as the signature type.
- Click +Add Stakeholder and choose Aadhaar Online as the mode.
- Enter the signer’s details, including their name (as it appears on their Aadhaar card), email, and mobile number.
- You may also enable options like WhatsApp notifications or capture live image if specific verification is needed.
- Notify Signers: Review the progress in the activity logs and click Proceed to send invitations to the signers.
Signer Journey
Signers receive an invitation via email or WhatsApp and must follow these steps based on the chosen authentication method:
- General Steps (All Methods)
- Click the Sign Document or Sign Now button in the invitation.
- Preview the document on the SignDesk portal and check the consent checkbox to proceed.
- Select the desired Authentication type (OTP, Biometric, Face, or Iris).
- Authentication via OTP
- You are redirected to a service provider page.
- Accept the consent, enter your Aadhaar number, and click Send OTP.
- Enter the OTP received on your Aadhaar-linked mobile number and click Verify OTP.
- Authentication via Biometric
- Connect a biometric device to your system.
- Enter your Aadhaar number, choose the connected device, and provide consent.
- Click Capture and place your finger firmly on the biometric device as instructed.
- Confirm the successful capture by clicking OK.
- Authentication via Face
- Requirements: Requires the SignDesk SDK and the UIDAI Face RD Service App.
- Open the signing link within the SignDesk application or integrated SDK.
- Select Face authentication, enter your Aadhaar number, and click Capture Face Details.
- Follow instructions (such as blinking your eyes) to capture your face through the camera.
- Authentication via Iris
- Select Iris as the authentication type and choose the connected iris device.
- Enter your Aadhaar number, provide consent, and click Capture Eye.
- Follow instructions to look into the device for authentication.
Can I Use Aadhaar eSign On A Mobile?
After successful authentication, the signature is affixed to the document and any attached stamp paper. Signers can download the completed document immediately, and a copy, along with an audit trail, is sent to the registered email address or WhatsApp number.
Yes, you can eSign using a smartphone.
Steps:
- Open the document link on mobile browser.
- Choose Aadhaar eSign option.
- Enter Aadhaar/VID.
- Verify using OTP.
- Download signed PDF instantly.
No app installation or USB device is required.
What Documents Can Be eSigned Using Aadhaar?
Aadhaar eSign is widely used across industries. Common enterprise applications include:
- Bank account opening
- Fintech customer onboarding
- Loan agreements
- Insurance policies
- Vendor agreements
- HR onboarding documents
- Compliance filings
It is not used to sign the Aadhaar card itself but to sign other documents using Aadhaar authentication.
How to Enable Aadhaar eSign?
Individuals do not manually “enable” Aadhaar eSign.
Instead:
- Organizations integrate Aadhaar eSign via licensed service providers.
- The service is activated through API integration.
- UIDAI provides authentication, not the signing platform.
If you are an enterprise:
You must partner with an authorized eSign provider such as Melento that integrates with Certifying Authorities.
How to Verify or Validate Aadhaar eSign?
To verify an Aadhaar eSigned document:
- Open the signed PDF in Adobe Acrobat Reader.
- Click on the signature panel.
- View certificate details.
- Check Certifying Authority validity.
- Ensure signature shows as “Valid.”
You can also:
- Verify using CCA certificate validation tools.
- Check audit logs (IP, timestamp, OTP validation).
A valid Aadhaar eSign will display:
- Signer name
- Signing time
- Certificate issuer
- Integrity confirmation
Is Aadhaar eSign Legal and Secure?
Yes. is legally recognized under:
- Information Technology Act, 2000
- Controller of Certifying Authorities (CCA) framework
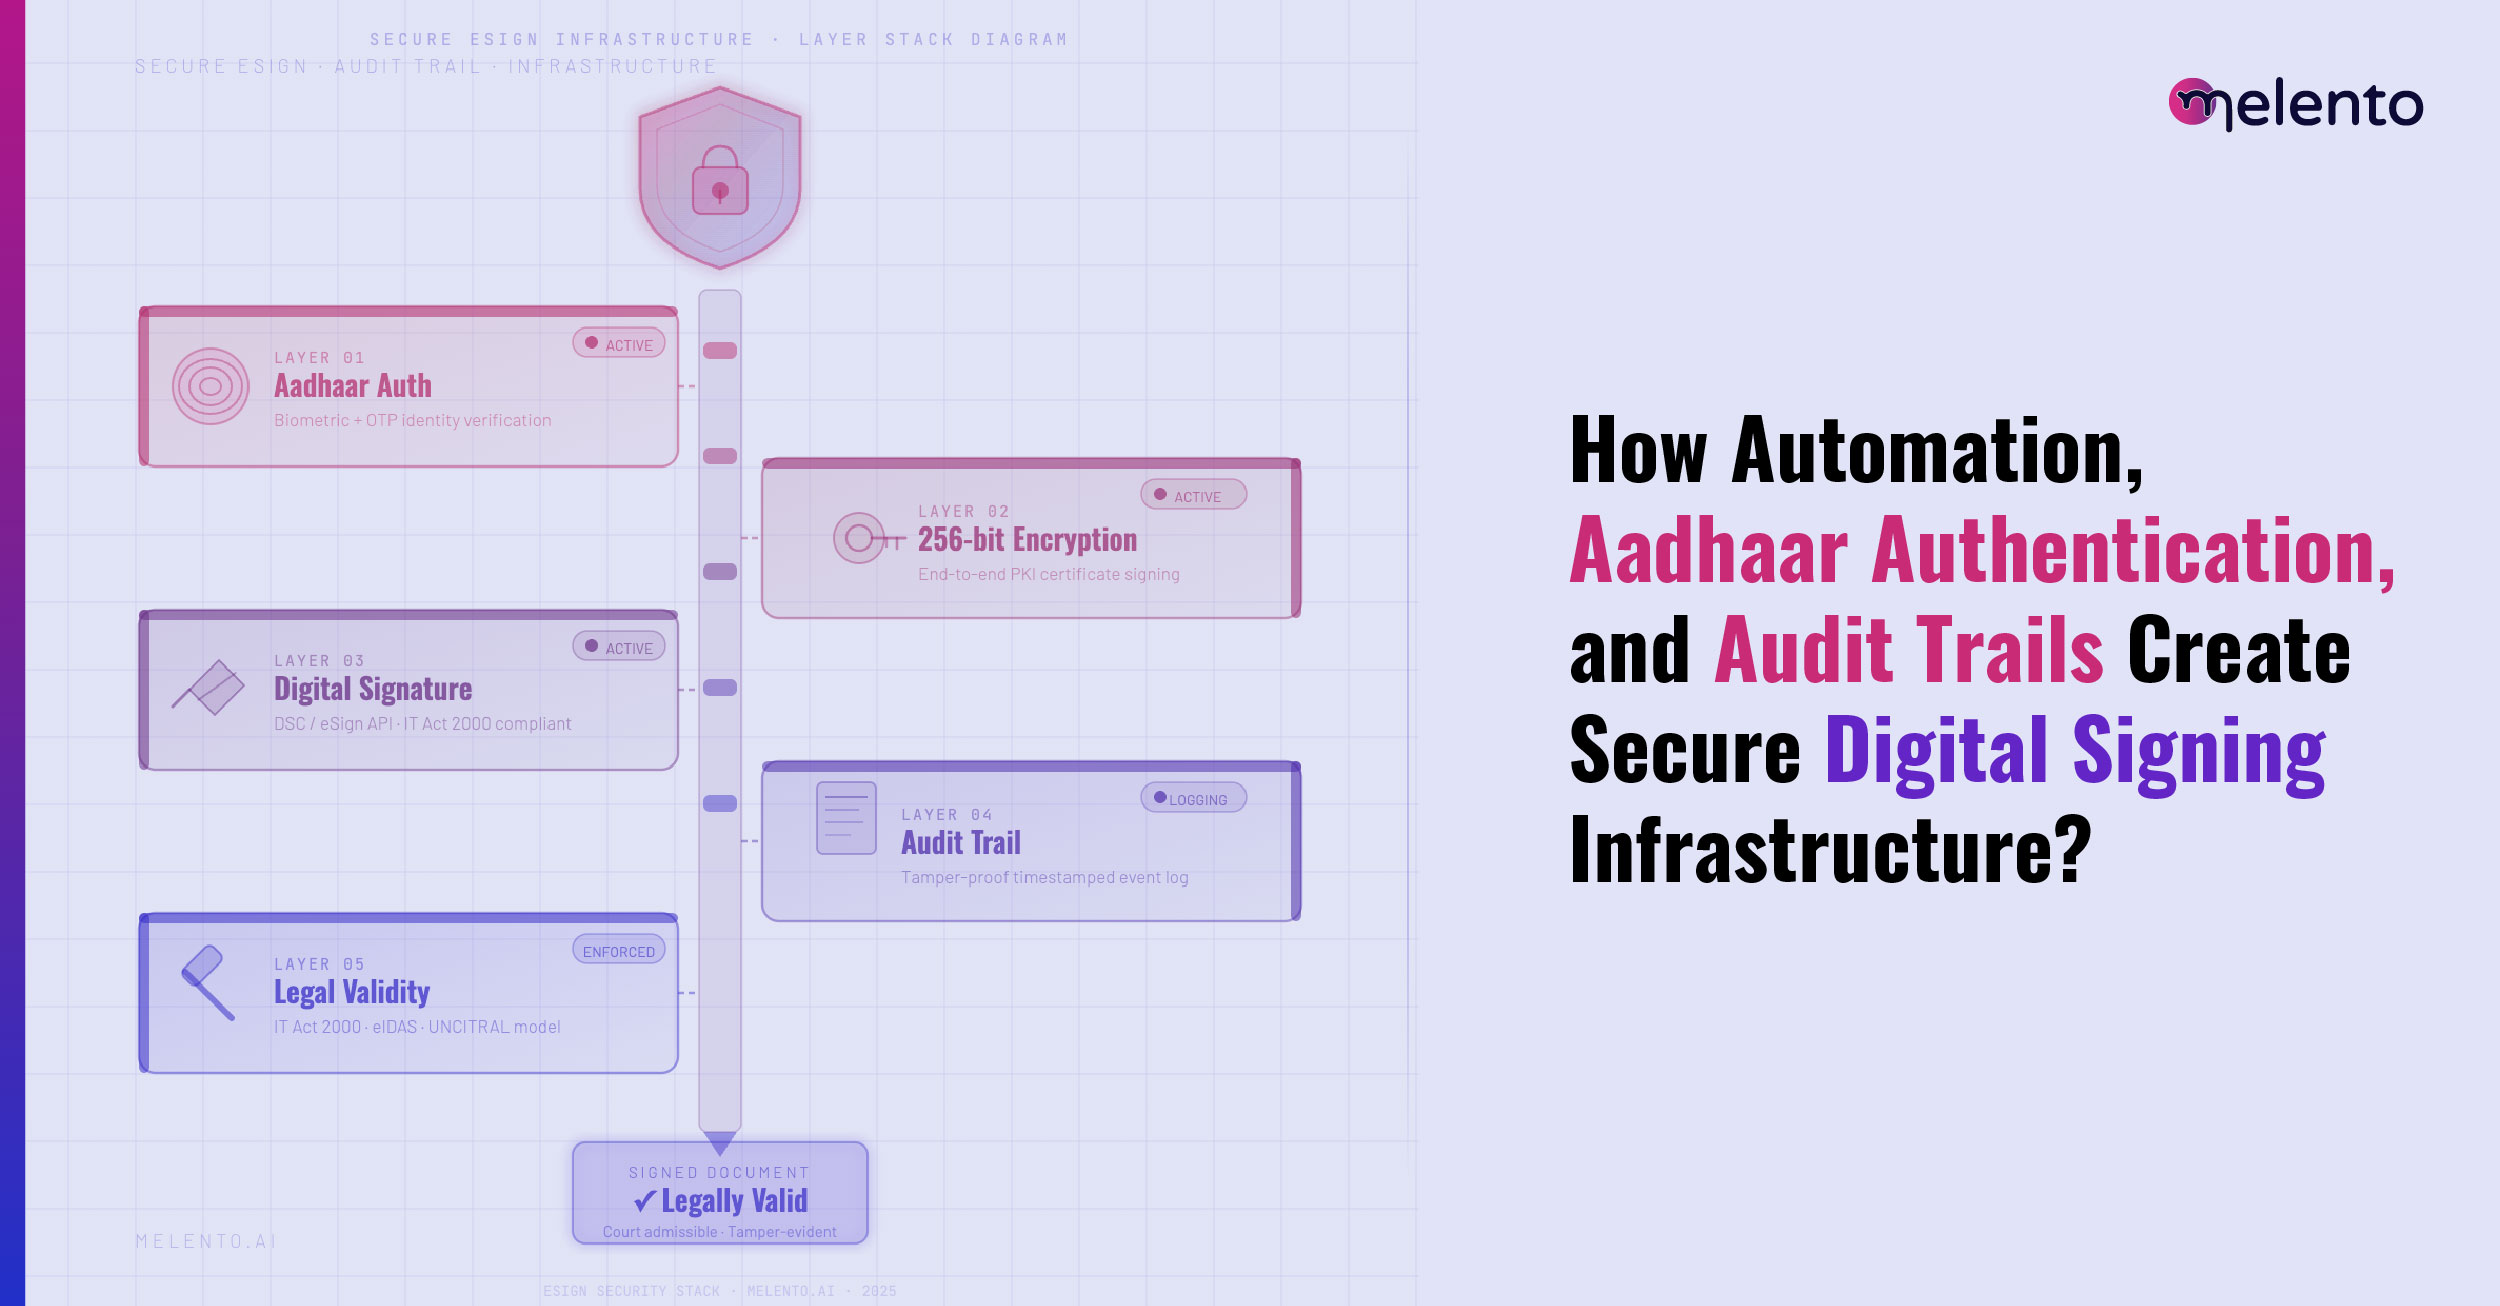
Security mechanisms include:
- Aadhaar identity authentication
- Cryptographic digital signatures
- Tamper-proof document locking
- Timestamp verification
- Detailed audit trails
These ensure identity verification, document integrity, and non-repudiation.
How Enterprises Implement Aadhaar eSign?
Individuals typically use Aadhaar eSign within apps.
Enterprises, however, require API-driven workflow integration.
The enterprise implementation process usually involves:
- Partnering with an authorized eSign provider
- Completing compliance onboarding
- Integrating APIs into workflows
- Configuring authentication journeys
- Launching automated signing processes
Platforms like Melento allow organizations to embed Aadhaar eSign directly into onboarding systems, contract workflows, vendor management processes, and compliance documentation.
Why Enterprises Use Melento for Aadhaar eSign?
While Aadhaar authentication is provided by UIDAI, the scalability and workflow automation depend on the platform implementing the signing infrastructure.
Melento provides enterprise-grade Aadhaar eSign orchestration.
Key capabilities include:
- Aadhaar eSign API integration
- Secure OTP and VID authentication workflows
- Enterprise document orchestration
- Real-time signing dashboards
- Bulk signing workflows
- Compliance-ready audit trails
- Integration with contract lifecycle management systems
This enables organizations to move from simple document signing to fully automated digital documentation workflows.
Key Takeaways
- Aadhaar eSign enables legally valid digital signatures using Aadhaar authentication.
- It eliminates paper signing and hardware digital signature tokens.
- Each transaction generates a temporary digital certificate.
- It is widely used across banking, fintech, HR, and compliance workflows.
- Enterprises implement Aadhaar eSign through workflow platforms such as Melento.
How to eSign Documents Using Aadhaar on Mobile?
Aadhaar eSign works seamlessly on smartphones. Users simply open the signing link, enter their Aadhaar number or VID, verify OTP, and download the signed document instantly.
How to eSign Loan Agreements Using Aadhaar?
Banks and fintech platforms use Aadhaar eSign to digitally execute loan agreements, enabling customers to sign documents remotely without visiting a branch.
How to eSign KYC Documents?
Financial platforms integrate Aadhaar eSign to allow customers to digitally sign KYC forms and account opening documents securely.
How to eSign Contracts Using Aadhaar?
Businesses use Aadhaar eSign to execute vendor contracts, employment agreements, and service agreements instantly.
How Aadhaar eSign Works in Banking Apps?
Many digital banking apps integrate Aadhaar eSign to complete onboarding workflows, enabling customers to sign documents within the application using OTP authentication.
Conclusion
Aadhaar eSign has transformed digital documentation in India by making legally valid signing instant and accessible.
Whether you are:
- An individual completing KYC
- A startup onboarding customers
- A financial institution processing agreements
- Or an enterprise digitizing contracts
And if you’re looking to implement it at scale, Melento delivers the most enterprise-ready Aadhaar eSign infrastructure built for performance, compliance, and growth.